Drawing a See-You-Later present

So, my friend Brittany just graduated from college and is moving to China for a year as a missionary. I’m going to miss her so much, but I decided to do this quick drawing as a see-you-later present.

First off, I chose a picture I wanted to draw and did a really faint, rough outline. It all just starts with circles and oblongs, and I usually just go over it with more and more detail until it’s an outline I’m happy with.

Screen Shot 2014-08-12 at 3.48.47 PM

Next, I went in with a thicker black outline. This is where it’s really important to get the facial features right. I also added the creases in her clothes and the flowers in her hair.

Screen Shot 2014-08-13 at 10.32.31 AM 

The next step is my favorite part- adding the color! This is the part where you have to really look closely at your reference picture for all the variations in hues-where the darks and lights are- etc. Since I had already put in the black outline, it’s kinda like working on a coloring book- but shading at the same time.

Screen Shot 2014-08-13 at 10.36.02 AM

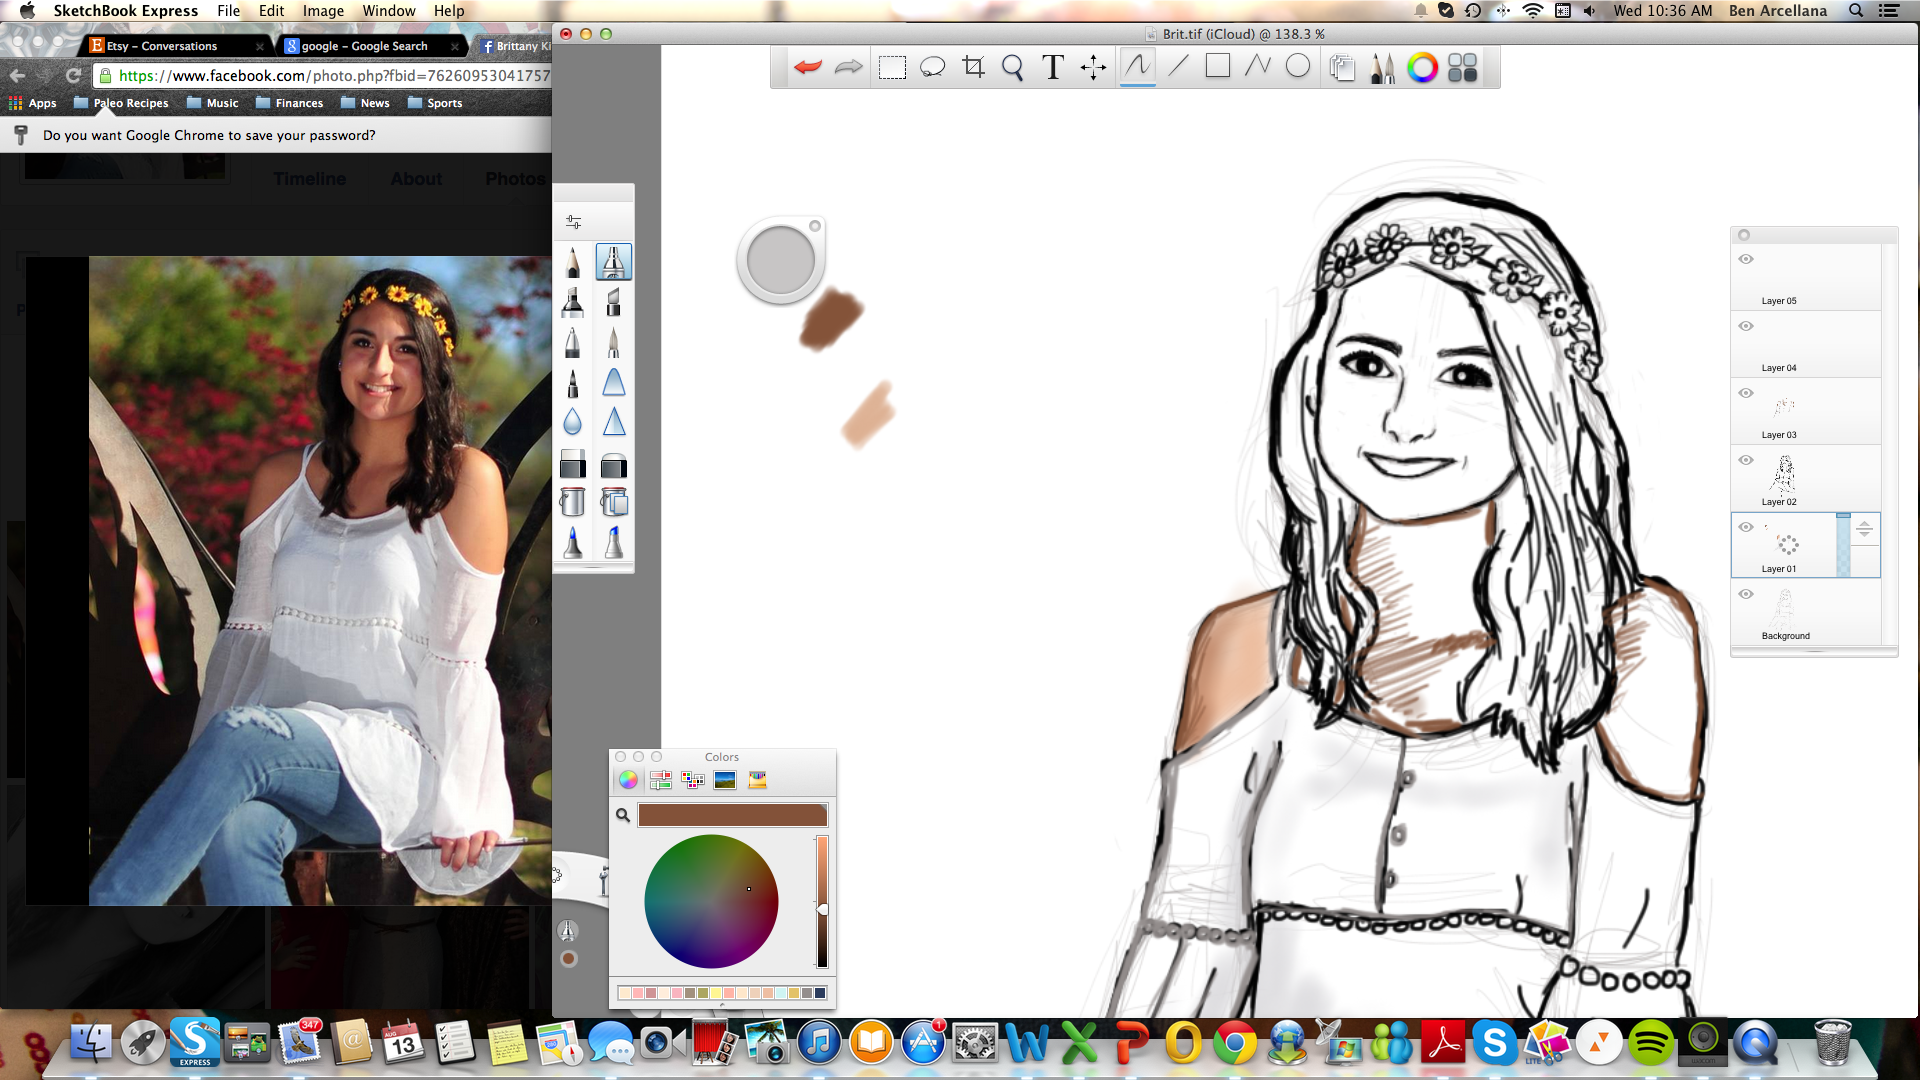
Just keep adding color… I think in this stage I sort of removed the black outline to see what it would look like if I just outlined each section with a darker color. For example, her shirt is white, so I outlined it with grey. Her skin was tan, so I outlined that with a dark brown. I think this is what I went with in the end.

Screen Shot 2014-08-13 at 10.57.59 AM

The hair is the trickiest part of coloring. My tip is to just make sure your brush/pencil is set really small. Treat each stroke like a strand of hair, and just keep layering. It takes practice.

Screen Shot 2014-08-13 at 11.26.56 AMScreen Shot 2014-08-13 at 11.35.46 AM

Brittany portrait

Here’s the finished product! Comment what you think, and please follow me!

Scratch Art Tutorial

Some of you might have seen my first scratch art piece on the “Portfolio” page. That was one of my very first art pieces that I did when I started art class. Since then, my art teacher likes going around and showing her other students what she calls “The best scratch art any student of mine has ever done”. And that’s a lot, since she’s been teaching kids for decades. This is my reaction on the inside:

aw shucks

(I really like the Sprouse twins, so I couldn’t pass up that gif.)

So it’s been a couple years, but I did another scratch art!

Tip: When you look for a picture to do for scratch art, make sure there’s LOTS of contrast. In black and white form, it should be as close to just black and white as possible. Make sure there aren’t much greys in the picture. This makes life so much easier.

So once I found a good picture to do, I printed it out.

Tip: Print out your picture in the exact size you want. Then tape it (with masking tape or painter’s tape so it doesn’t peel your art work) on to the actual scratch art paper, the picture you printed facing up.

Here’s what mine looked like with the piece of paper taped on it. This is how to outline your scratch art drawing. Make sure the picture is on the exact spot where you want your image.

photo

Tip: To outline your scratch art, use a colored pen. Press down on the paper hard to outline the details you want to scratch. Using a colored pen helps let you know what you’ve already marked and what you haven’t. This should leave marks on the actual scratch art paper. Once you have marked the whole picture, remove the piece of paper and you should see that your scratch art paper has markings that you can use as an outline.

Once I finished pressing down with a colored pen, here’s what it kinda looks like and here are the things you need to get started scratching:

photo 1-1

You can kinda see the pen markings here. And also, obviously you need something to scratch with. I have a simple pen holder and three scratch knives with different tips. A smaller, sharper one for details, and a couple bigger ones to cover larger areas.

Tip: Make sure you have a practice sheet! Scratching takes practice, so test out your tools first! And if your pen isn’t scratching easily or effortlessly, you’re probably holding it wrong. It should scratch smoothly.

photo 4


Tip: Unlike pencil, you can’t really undo or erase scratch art. So BE CAREFUL!!!! If you really messed up, try using a black pen to cover any mistakes.


photo 2

It takes practice and patience, but it’s lots of fun!

Thanks for taking the time to read this! And if you want me to do more tutorials, please let me know in the comments!